¶ Proxmox Configuration
¶ Blank Data Center
If you have connected your MultiPortal instance to your Proxmox Data Center but do not see any nodes or storage information, it may indicate an issue with the configuration of your API Token in the Proxmox environment.
To verify and ensure the API Token is correctly configured:
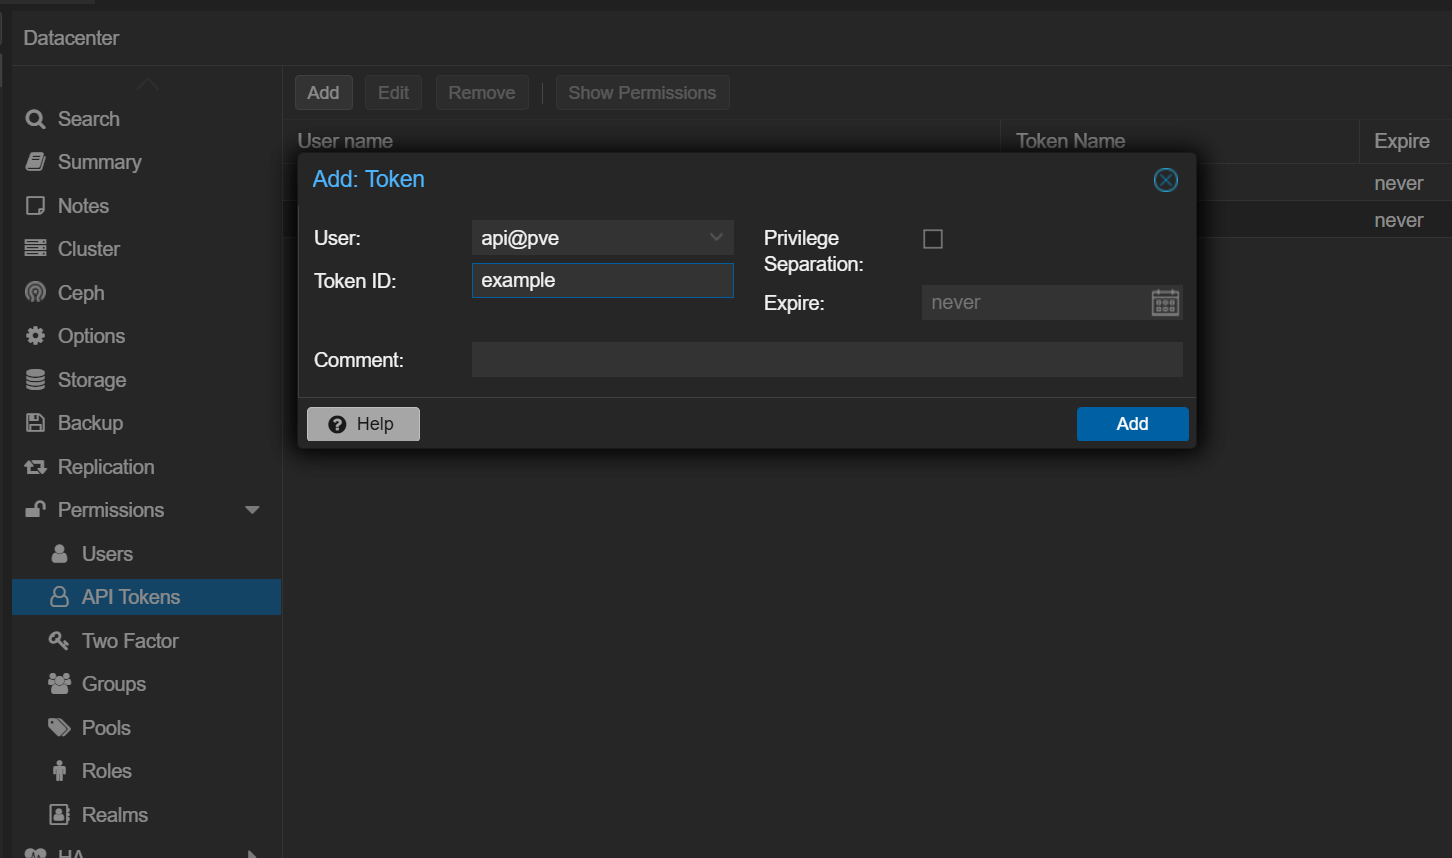
- Log in to the Proxmox VE web interface.
- Navigate to Datacenter > API Tokens.
- Confirm that the API Token is associated with the correct user (e.g.,
API@pve). - When configuring the token, Uncheck Privilege Separation as shown in the image below, and click Add to save.
By verifying these settings, MultiPortal should be able to retrieve node and storage information from your Proxmox Data Center.
¶ SSL Certificate
MultiPortal uses Caddy Server to host the application and automatically generate an SSL certificate with Let’s Encrypt. To enable this process, ensure that ports 80 and 443 are open and that your Fully Qualified Domain Name (FQDN) is configured correctly.
Important:
The application has only been tested with direct internet access when generating the SSL certificate for the first time. Running MultiPortal behind a proxy or reverse proxy has not been extensively tested and may cause issues with certificate generation.
If you are using Cloudflared, follow this guide to set up MultiPortal: Using Cloudflare Tunnel
The Caddy configuration file (Caddyfile) is located at:
/etc/caddy/Caddyfile
This file points directly to your installation folder at:
/var/www/multiportal.example.com
¶ Verifying Your FQDN
Before proceeding, set your domain’s A/AAAA records to point to your server. To do this, log in to your DNS provider and update the domain’s DNS settings.
Once updated, verify the correctness of the DNS records with an authoritative lookup. Replace multiportal.example.com with your domain name, and if you're using IPv6, replace type=A with type=AAAA:
curl "https://cloudflare-dns.com/dns-query?name=multiportal.example.com&type=A" \
  -H "accept: application/dns-json"
¶ Caddy Service
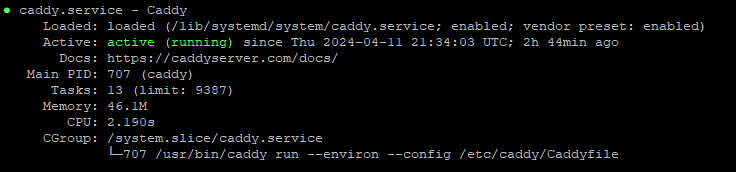
To confirm Caddy Server’s status, run:
systemctl status caddy
Note:
Caddy may take a few minutes to obtain your certificate on its initial run. It will keep trying, but after several failed attempts, Let’s Encrypt may temporarily block further requests. The output of the above command will indicate if Caddy is blocked or has succeeded.
If Caddy is not running, MultiPortal will be unreachable. You can manage Caddy with:
- Start Caddy:
systemctl start caddy - Stop Caddy:
systemctl stop caddy - Restart Caddy:
systemctl restart caddy
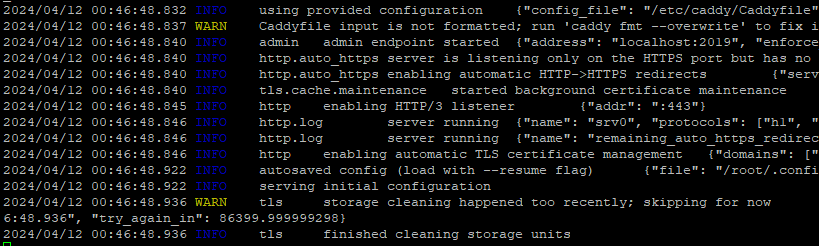
For detailed troubleshooting, stop Caddy first, then run:
/usr/bin/caddy run --environ --config /etc/caddy/Caddyfile
The console output will display INFO and WARN messages.
¶ Caddy Server Logs
¶ Runtime Logs
To obtain runtime logs for the Caddy service within a specific time period, use:
journalctl -u caddy.service --since "2024-07-01 00:00:00" --until "2024-07-01 23:59:59" > caddyLogs.log
This command creates a caddyLogs.log file containing the journal entries for the specified time range. Adjust the date and time as needed.
If requested by support, download this file from your server and send it to them for assistance.
¶ Log Files
MultiPortal outputs Caddy’s error messages to a domain-specific log file. This file is located at:
/var/log/caddy/yourdomain.com.log
Replace yourdomain.com with the actual domain used for your MultiPortal installation. If support requests logs, download this file and send it to them.
¶ Updating Caddy Configuration for Logging
Installations prior to MultiPortal 0.6.0 do not have correct logging configurations in Caddy. If you are running a version before 0.6.0, update your Caddyfile manually or run a script to fix the configuration.
¶ Manual Update
-
Locate the
Caddyfile:/etc/caddy/Caddyfile -
Edit the
Caddyfileand add the following code at line 21, replacingyourdomain.comwith your domain:log { output file /var/log/caddy/yourdomain.com.log level error }
¶ Scripted Update
Alternatively, run the following script to automatically update your configuration:
sudo bash -c "$(wget -qLO - https://downloads.multiportal.io/scripts/caddyLogFixer.sh)"
The script will prompt you for the hostname of your MultiPortal installation and update the Caddyfile accordingly.
¶ MultiPortal Error Logs
MultiPortal provides an easy-to-access error log feature within the web portal to assist with troubleshooting. If issues arise, you may be asked to share these logs with support.
To download the error logs:
- Click on the profile menu in the top-right corner.
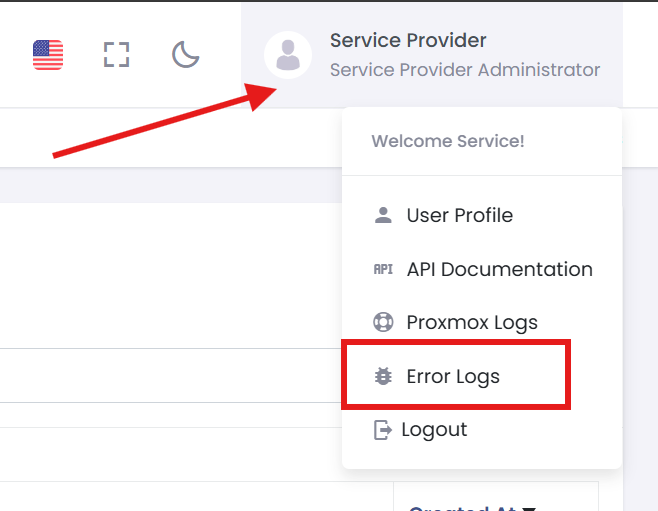
- Select "Error Logs" from the dropdown menu.
- Click "Download All Logs" to save the logs to a file.
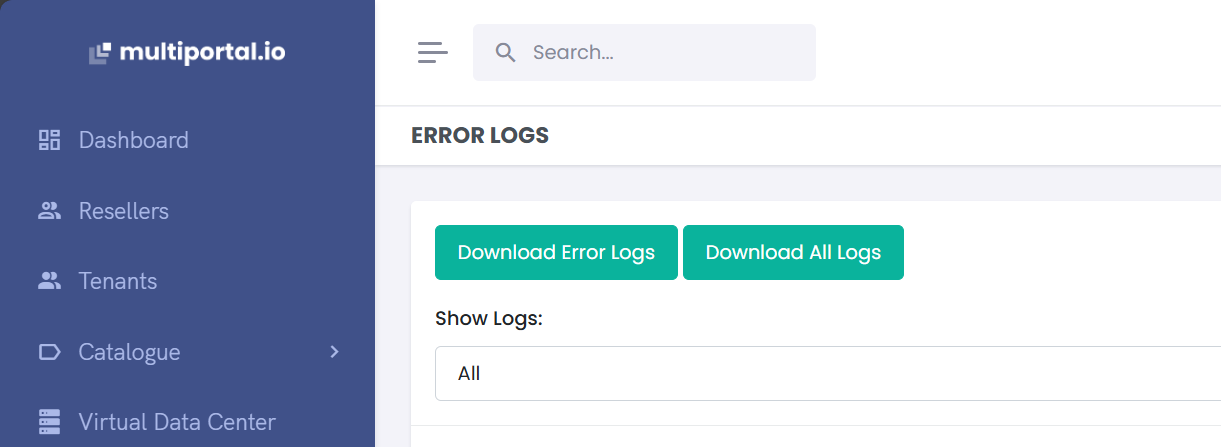
Send this file to support for assistance in resolving any issues.
¶ Permission Issue While Updating
When updating MultiPortal, the system performs a preliminary check to ensure that file permissions are correctly configured. This check is essential to maintain the integrity and security of the application during the update process. If any permission issues are detected, the update process will be halted until the issues are resolved.
¶ Resolving Permission Issues
To fix permission issues and proceed with the update, follow these steps:
- Change to your application directory
Replace multiportal.example.com with your FQDN
cd /var/www/multiportal.example.com
-
Run the Permission Fix Script
MultiPortal includes a tool to automate the resolution of permission problems. Execute the following commands from the to use the tool:
chmod +x tools/permissionFix.sh ./tools/permissionFix.sh -
Execute as Root
Ensure you run the script with root privileges. The script needs elevated permissions to modify system-level file permissions.
-
Provide the Default User
During the execution of the script, you will be prompted to input your default user. This is typically the user who owns the files and manages the MultiPortal instance. Press Enter to accept the default user if it is correct.
-
Verify Completion
Once the script completes its execution, the permissions should be updated successfully.
-
Return to the Updater
After fixing the permissions, navigate back to the updater and retry the update process. The system should now allow you to proceed without any permission-related interruptions.